Hosted Payment Page overview
What is a Hosted Payment Page?
A Hosted Payment Page allows you to direct shoppers to an external payment page, hosted by Truevo, for them to enter their payment credentials and securely complete purchases.
We host this page outside of your website on our secure servers. When a cardholder wants to make a payment on your website, you redirect them to the Truevo-hosted page. Truevo handles the payment end-to-end, including 3D-Secure verification, and automatically redirects the shopper back to your website upon completion.
A Hosted Payment Page allows you to remove the technicalities of processing payments, letting you focus on your business.
Benefits of a Hosted Payment Page
- Truevo takes care of the entire transaction process and provides a simple integration mechanism.
- Payments are processed independently on secure and reliable servers. This ensures that you can take payments at any time while keeping your customers’ sensitive information safe.
- The collection of payment information is performed by the host server. This reduces the security requirements imposed on you, making it much easier to remain PCI-DSS compliant.
How does a Hosted Payment Page work?
You’ll need to specify the details of the payment, redirect your shoppers to Truevo, and finally handle the result of the operation.
The steps are as follows:
- Make a request to the Truevo service to create a payment session. This will include the details of the payment, such as the amount and currency.
- Truevo will return the URL to the payment page configured as per the information supplied.
- You will hand over the process to Truevo by redirecting your shopper to the URL supplied.
- The cardholder will complete their purchase on the Truevo payment platform.
- Once payment is completed or has been aborted, Truevo will redirect the shopper back to your website.

As an added security measure, when a link for the Hosted Payment Page is created, it’s only valid for 15 minutes. This measure assists in preventing the misuse of these links.
How to integrate a Hosted Payment Page
When your customer loads a checkout page, follow these five steps:
- Create a Hosted Payment Page Session
- Receive your Hosted Payment Page URL
- Redirect your Customer to Hosted Payment Page URL
- Allow Customer to Complete the Purchase
- Receive the Transaction Result
1. Create a Hosted Payment Page session
You will need to start by creating a Hosted Payment Page session. To do this, make a PUT request to the payment page API endpoint, passing in the necessary payment information, such as a reference, payment amount, and the web page to return to after the payment has completed. Refer to our Hosted Payment Page parameters for more on the fields used to create a payment session.
PUT https://pay.truevo.com/paymentpage Credentials
Truevo will issue a merchant identifier (mid) and terminal identifier (tid) to be used in the requests.
Sample request
{"storeName":"The Camping Store","successUrl":"https:\/\/www.truevo.com\/payment_success","failureUrl":"https:\/\/www.truevo.com\/payment_failed","declinedUrl":"https:\/\/www.truevo.com\/payment_declined","transaction":{"merchantReference":"Order 123","paymentReference":"Camp Website","amount":{"totalAmount":0.99,"currencyAlphaCode":"EUR"}},"merchant":{"mid":"999999","tid":"000000"},"additionalData":[]}
To ensure authenticity and integrity of the payment transaction, a digital signature can be supplied. Read how to create it on the digital signature algorithm page.
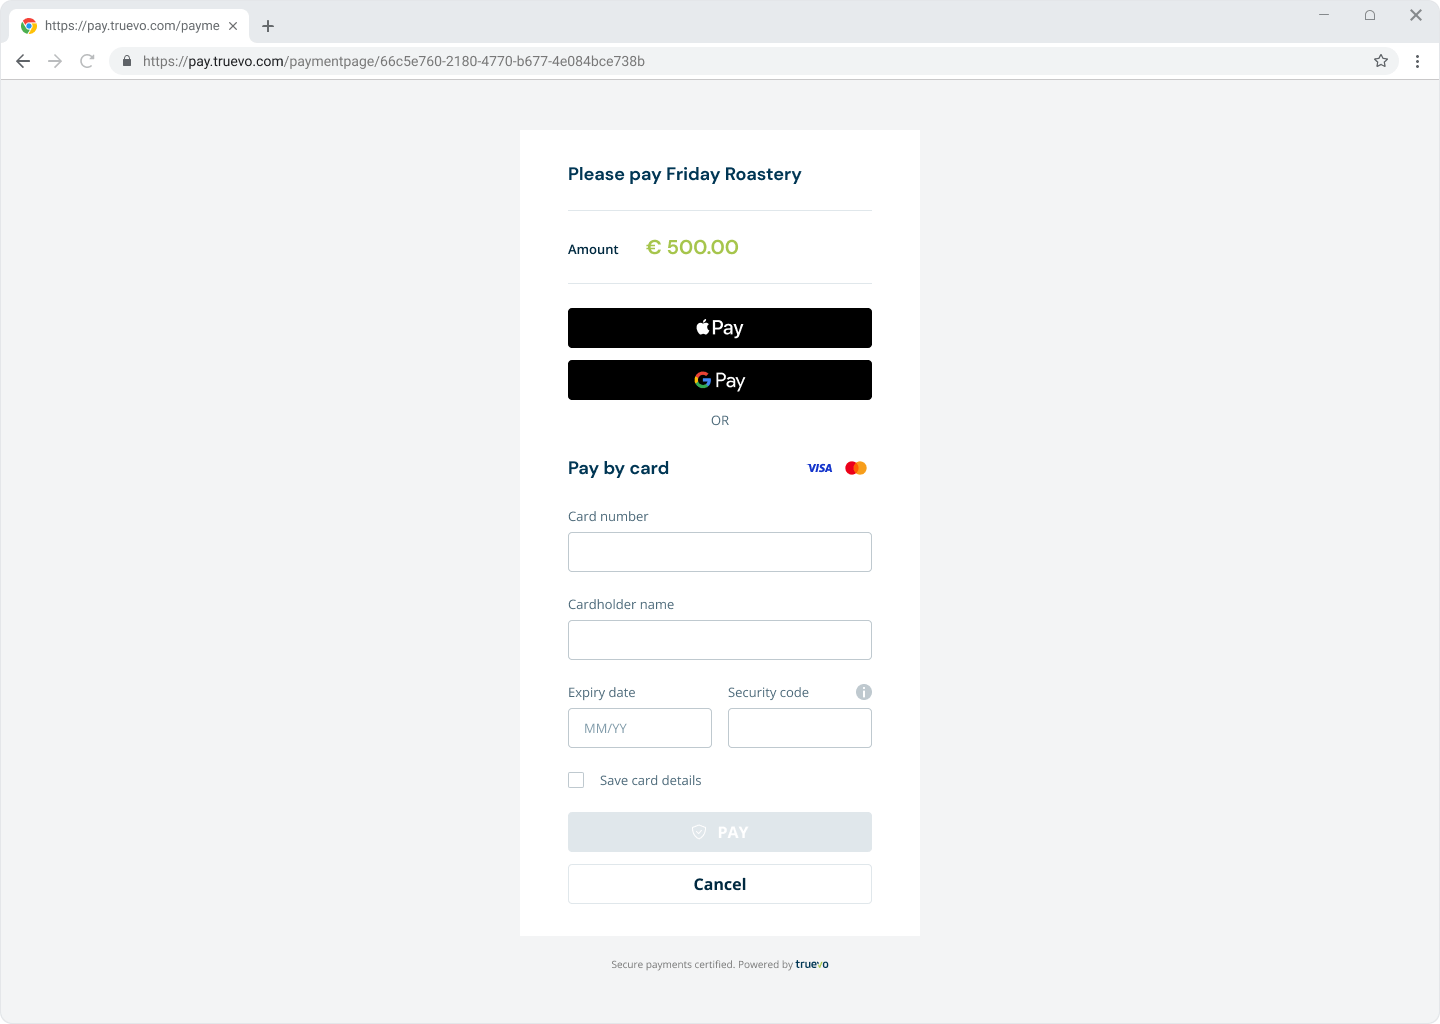
2. Receive your payment link
The API response will include the URL to which you must redirect the customer.
Sample Response
{"redirect_url":"https:\/\/pay.truevo.com\/paymentpage\/66c5e760-2180-4770-b677-4e084bce738b","outcome":{"status":"SUCCESS","message":"Ok"}}
3. Redirect your customer to the Hosted Payment Page URL
Once you have the URL, redirect your customer to the Truevo-hosted payment page. All aspects of the payment transaction cycle will now be handled for you.
4. Accept the transaction result
Once your customer has filled in their payment card details, Truevo will process the transaction.
Depending on the outcome of the payment, Truevo will redirect your customer to a URL that you supplied in the body of the request in step 1. This will allow you to handle the result of the transaction.
These are the possible responses:
- Payment Successful
- Payment Declined
- Payment Failed
A URL should be supplied for each.
The parameters Truevo will supply when returning to your website are illustrated below:
Example:
					https://www.myshop.test/payment_success?transactionId=xxxxx
&rrn=xxxxx
&transactionStatus=COMPLETE
&responseCode=01
&merchantReference=Order123